Welcome to MY STUFF ROOM - a space for my collection of STUFF ... STUFF GALORE ... GALORE-IOUS STUFF! ... INSPIRING STUFF I find online, and maybe even some STUFF I create myself. It's all Stuff that makes for a Creatively Galore-ious Day! ... Thanks to all who share their talents! I love to see it ... it truly inspires.

Thursday, June 19, 2014

Lettuce Heads

This comes from a magazine my husband gets - THE FURROW (Summer 2014).
The article is Plant Talk by Lorne McClinton

I liked the cute look here and saved it ... that's all!


Lettuce heads vs Potato heads ...,  fun playthings!

Wednesday, June 18, 2014

Don't Worry ...


“Don't worry about a thing, every little thing is gonna be alright”
Bob Marley

SaveSave

Tuesday, June 17, 2014

Father's Day Tablescape

I enjoyed creating a tablescape for Father's Day that was simple, masculine (well, at least not flowery and pink), and beautiful.  
I began thinking of what I'd use and wished I had purchased a new cloth and a centerpiece, but quickly realized I had enough and could put something together using only things that I already had.  
So I set out to complete that task.


I pulled out a piece of fabric I have previously used for a table cloth and then chose some linen napkins I had purchased several months ago but never used.  I began placing my most masculine looking plates on the table and then added goblets to match, trying to stay away from the pinks and purples.


My plate did have a pink flower on it, but the edge was a grey/blue color. (Men do need a touch of feminine at their side, and I love being at my husband's side ... insert smile here!)


The colors were earth tones - browns, gold/yellow/amber, greens, blues/greys/silver. 


For the centerpieces I pulled out some colored bottles and set them on vintage silver trays.  


I thought it was complete until I remembered that I had some Chick-O-Sticks and that they have been among my husbands favorite candy ..., so I placed one above each plate. 


Now it was complete ..., or so I thought.  
I realized as we all sat down at the table that it had not been complete until that moment.
  
Family is what made the difference, and having the father of my children, my husband, beside me on Father's Day was what made this day so special.


An End Note - many times we see a family at the table with the father at one end and the mother at the opposite end and all the others in between.  That has never appealed to us, so in our family it has been the father at the head of the table (and our table only has one head) and the mother beside him (see the flowered plate and the empty spot - I'm up taking a photo at this time, but promptly took my place beside him when that photo was complete)
That is the way it has always been for us - at church or on the sofa or anywhere usually - my husband and I next to each other and the kids sit beside us or around us ..., not between us!  


I love it that way!


SaveSave

Monday, June 16, 2014

Baby Boy Shower


We had a fun baby shower under a tent in our back yard a few weeks ago.  One daughter in law planned it for another and her baby boy.  Here is a quick recap.


Here is the WELCOME sign/board -
It shows the theme for the event.


We purchased a tent and had fun putting it up.


She decorated the inside like this -
She also put some toy lions, tigers, and bears (that were spray painted gold) on the table centers too, but they weren't there when this photo was taken, but one can be seen on the closest table in the next photo.


Guests came and enjoyed the event -
We enjoyed the guests.


And here is the food  -
It's a Brunch!


We love boys!  We love girls too!  We welcome every baby and love our children and grandchildren.

Oh!  Here is our gift to our sweet grandson ...
They are from Amazon.  Can you tell I'm a Prime member?  ;)


Friday, June 13, 2014

BBQ

I saw this awesome BBQ set up on facebook and I can't pin from there so I had to add it here so I could save the look.


A Graduation Party


A graduation party for our daughter ...


If you have been watching this blog for a while, you've seen parts of the look here, here, and here, but there were a few other things I want to share now to help complete the look. 


The food/buffet tables.


I purchased some black 10x14 inch plastic trays from Amazon to help guests carry their food - we did not use plates.  They were the perfect size for what I was looking for.  They have larger trays like we see used at schools and other buffet lines, but they were too big for what I was hoping for.


We added a paper doily to each tray.  Here is a close up so you can see the sample tray we put together at the beginning of the line.


FYI - here is what we served:
wraps (Turkey BLT and Roast Beef Coleslaw),

pasta salad or lettuce/pear salad in berry boxes lined with waxed paper,

individual bags of assorted Sun Chips,

Banana Slush, and ice water

For dessert we had Cheese Cake (one of our daughters favorites), candy (including some of those fun rock candy on a stick) and an assortment of Ice Cream Bars and Fruit Bars (from Costco).


FYI - Those cute Rock Candy on a Stick came from Amazon, of course!


Between the two buffet tables we had this pedestal with flowers and B for BrittanyJo - our guest of honor.
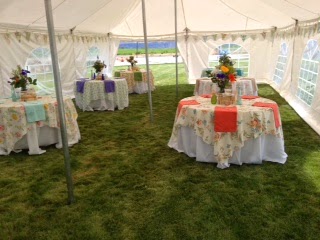


The tablecloths (vintage sheets cut up into squares, laid over white cloths) needed some coordinating solid color napkins. 

I have purchased from Table Linens for Less before and liked one set I got (but they don't carry them anymore) but most of theirs are fabrics I don't care for.  My desire was to find 100% cotton.  I found some in perfect colors on Etsy but they were expensive - 2 for $18.00.  I could make them much cheaper but just didn't have the time.  I found a few on Amazon, though the colors were just a little different than I really was looking for, but they worked fine anyway.  I chose from two different kinds so that I could get the correct colors (or closest to the correct colors) -


Cotton Craft Napkins - 100% Cotton - 20" x 20"
(I purchased Lavender at $16.99)


DII  100% Cotton, Oversized Basic Everyday  20" x 20"  Napkin
Prices change by color and count - some come in sets 4, others in sets of 6, and white in 8
(I purchased the black 6ct for $18.00, 6 ct Guava for $24.00.)


FYI:
The napkins by Cotton Craft are lighter weight than those by DII and I liked the softness of them, though both are quite nice.  I washed all the napkins before we used them and there were slight wrinkles in all of them.  After washing them the second time (after use) I noticed that the Cotton Craft (lighter weight brand) were a bit more wrinkled than the DII - mostly around the hem areas.  It will be interesting to see what a third washing will do to them but I don't have time to wash them to find out.  If you don't like the wrinkled look both would have to be ironed, but the DII are a bit less wrinkled coming out of my washer and dryer.  I would buy either brand again and be happy.


At the entrance was this cute little bicycle we painted and adorned with a great inspirational quote -    "Life is like riding a bicycle, to keep your balance you must keep moving."

A few of the gifts were placed on the shelf under the bike.


We have used this tent twice now (the first event will be posted here) and forgotten to take pictures of the tent itself when it was up and complete.  The closest we can come to a full view from the outside is this photo with my brother and his grandchild.  We have enjoyed the tent and are planning on having it up at least one more time this year.  Maybe we can get a full view then ..., maybe! 


We purchased the tent from Amazon too.  We have been pleased with it, though the plastic (rope cinch) pieces have broken - my boys have just tied the ropes instead of using those pieces.  Here is what we purchased, but I noticed before I posted this that it is no longer available.  That makes me sad because it has been a great item for what we have been using it for. There are other sizes and options still available, but this is what we purchased.


40'x20' PVC Pole Tent - Party Wedding Canopy Shelter by Delta
($919.98 = cheaper than a rental + mileage; but I only checked out two places to rent from - and we live many miles from the city that offers them.)
It looks grey or taupe in their photo, but it is white.


We had a wonderful event, thanks to the family and friends that showed up, and to those who helped with all the preps.


Thursday, June 12, 2014

An Old Bike RePurposed


This was a cute little bike we got for our oldest son many years ago. 


It was used and worn when we purchased it ..., then it got more love and use and has been kicking around (not used) for the past too many years. 


I have been wanting to do something with it for awhile and decided it would be the perfect addition to our party décor since we had used this quote in our daughters graduation announcements.


FYI -  The "LIFE IS LIKE RIDING A BICYCLE" quote has been used in a previous post (HERE) ..., and something similar or complementary to it (HERE).


So after a can of spray paint this became it's new look.


Everything got sprayed except the handles.  It was a quick spray job since we were out of time, and we ran out of paint too soon too so there are places that could have used a little more.  Luckily it's a vintage look we are going for, so the look fits just fine.  

The paint we used was Valspar, Gloss Exotic Sea. 


For our party it's home was atop a shelf at the front entrance of our party tent.  It's new home will be ... somewhere in our yard ... when I find just the right place. 


Wednesday, June 11, 2014

Old Books RePurposed


I found this look on Etsy a while ago and loved the look. 


So when I was thinking about graduation decorations this came to the front of my mind and I wanted to create this look.

A good friend helped me shop for the books from thrift stores (because I have been somewhat homebound the last few weeks due to my husbands poor health), purchasing old hard bound books with ruffle-y edged papers.


I ripped off the covers and wrapped them with twine similar to what we see in the Etsy picture, but with my own touch of creativity, using what I had in my craft supplies.  I didn't worry about the bottom side of the books because they wouldn't be seen, but tried to make the sides and tops look the best.


You can see that a few of the books had some colored inside pages and we left those if they matched the colors we were using, but we only have a few because I really like the natural colors. 

I wrapped single books and stacks of two or three books together. 


I piled them as I thought looked best, sat a tea cup and saucer on the top of the stack and they became centerpieces for our tables.


We added some flowers and colored vases, bottles, and little heart ring dishes to complete the look on each table.


These items set atop a table cover made from vintage sheets (HERE).  I was really pleased with the look we created.


We used some on our food/buffet table too.


Now the books are boxed away in storage, but if I want I can pull them out and use them in my home décor somewhere.


The outside covers are stored away as well ..., just in case I need them for something later.   Oh Bother!  I have a hard time getting rid of things. 


Tuesday, June 10, 2014

Bunting and Tablecloths from Vintage Sheets


I have been collecting vintage sheets for a few years now.  Every time I can go to a thrift store I check out their selection and purchase any that catch my eye.  
(There is a piece of fabric or two and a shower curtain and maybe a window curtain as well in this collection, but they were all great pieces with great color for something I might want to create some time.)


I chose from my collection a few that worked well with the ideas we had for our daughters high school graduation party and created some table covers, then with the leftover portions I created some bunting - as many pieces as I could fit.


I purchased a serger (from Amazon) for this project because I knew I had a lot to do and didn't want to ask someone else to do this for me.  It worked like a charm for me, but I didn't try to learn any other stitches because of the time it took to do what I had to do ..., so maybe I'll have more fun with that later when I have some extra time (but I'm not holding my breath).


I serged the four sides of each of the 10 square and/or rectangular table covers and each of the three sides of the bunting pieces (I think one section has about 44 pieces and the other has about 47 pieces). 


I spent all of one day with this project - I had no idea it would take sooooo long, so I was especially glad I hadn't asked someone else to help me out here.  Though it was time consuming, it was so much easier and faster than folding and ironing and sewing and turning right-side out and ironing again ..., and I loved that the serger cuts and finishes the edge at the same time ..., and I really do love the finished look.


When the serging on the tablecloths were done they were complete so I washed and folded them, ready to use.   They looked lovely in a pile and they looked lovely on the tables, ready for the event.  You can see here that I paired them up with solid 100% cotton napkins in assorted colors, each to match the cloth they were on.  And those cute striped paper straws were placed on top the napkins. (RePurposed Book Centerpieces)


Serging the bunting took a little longer than the table covers did ..., I had several.  I used some of every tablecloth fabric, including pieces from the buffet table cloths I had prepared (I think there were a couple I didn't end up using).  When I was done serging the edges of each triangle piece I sorted them and sewed each piece onto a folded bias tape.


The bunting is double sided so that it could be hung in the center of a room and look nice from any view.   


Our tent doesn't have tall enough walls to put it back and forth across the room from one side to the other, so I wrapped it around the side walls and I love the touch of color that it gave to the walls and the way it brought everything together.  It gave the area character.


It was a little long for the wall, so we just folded it back a few feet ..., and that was cute too.


... I was so happy with the overall look ...


Vintage sheets helped us create a great look for a HAPPY GRADUATION!   (A Graduation Party)

And ... when I washed them after the event was over I realized how great sheets are for table covers because they don't come out all wrinkled, in need of ironing.  AWESOME!    They are folded and stored away for the next use ... some day!


Related Posts Plugin for WordPress, Blogger...