
I am so happy to announce ... FINALLY ... that our main bath redo is reDONE!
For many years our bathroom looked like this ...

then the wallpaper was removed ...
.JPG)
And more work was done, little by little ...
and now today the bathroom looks like this ...

Today's look at the main bath redo using my TO DO list ...
You'll see that each thing has been crossed off (maybe even changed a bit from the first and original list).
The purple words give a short bit of info - color choices or places we purchased each item.
For many years our bathroom looked like this ...

then the wallpaper was removed ...
.JPG)
and now today the bathroom looks like this ...

You'll see that each thing has been crossed off (maybe even changed a bit from the first and original list).
The purple words give a short bit of info - color choices or places we purchased each item.
TO DO:
- stronger ceiling fan,
-paint fan cover = I broke the old one so we had to replace it
We used parts and pieces from what we previously had from replacing the motor in fan.
(We didn't use the new cover piece when we originally replaced the motor, because it wouldn't fit the old box. Since I broke the old cover trying to replace it after painting it I had to go to plan B. We drilled small holes in each corner of the new cover and screwed the cover directly into the ceiling. My husband got to help with that job - lucky guy huh, I break the old one and he has to repair my mistake - he's familiar with that type of thing - poor guy!)
-remove wallpaper, (see this post)
-
We used parts and pieces from what we previously had from replacing the motor in fan.
(We didn't use the new cover piece when we originally replaced the motor, because it wouldn't fit the old box. Since I broke the old cover trying to replace it after painting it I had to go to plan B. We drilled small holes in each corner of the new cover and screwed the cover directly into the ceiling. My husband got to help with that job - lucky guy huh, I break the old one and he has to repair my mistake - he's familiar with that type of thing - poor guy!)
-
-paint ceiling,
Ceiling paint color is Valspar Spring Parade / Glossy.
-repair ceiling above shower and paint it,
-paint walls,
Main wall color is Valspar Playful Petal / Satin Gloss,
and the darker color on the two accent walls is Valspar Purple Hills / Satin Gloss. (we really like this color)
-caulk around tile at shower and tub,
-replace broken tile at tub/floor area, (I broke one removing the baseboard.)
-remove baseboard,
-sand and paint baseboard and window frame,
-replace baseboard,
-paint inside side of the door,
Trim color is Valspar Homestead Resort Jefferson White / Satin.
-put trim on floor in front of tub to help hold flooring in place,
This made a bit difference in the look, and we are happy to have done it. It's just a small piece of PVC trim purchased from Lowes, and cut to length. We glued it down instead of screwing or nailing it in. We wish we had done this when it was new. The vinyl was installed after the tub, so there was a raw edge. It was caulked, but with time and some water damage over the years it has peel up in places. This trim might have helped if it had been there from the beginning, but it definitely helps hide the ugly edge of the vinyl today.

-
Ceiling paint color is Valspar Spring Parade / Glossy.
-
-
Main wall color is Valspar Playful Petal / Satin Gloss,
and the darker color on the two accent walls is Valspar Purple Hills / Satin Gloss. (we really like this color)
-
-
-
-
-
-
Trim color is Valspar Homestead Resort Jefferson White / Satin.
-
This made a bit difference in the look, and we are happy to have done it. It's just a small piece of PVC trim purchased from Lowes, and cut to length. We glued it down instead of screwing or nailing it in. We wish we had done this when it was new. The vinyl was installed after the tub, so there was a raw edge. It was caulked, but with time and some water damage over the years it has peel up in places. This trim might have helped if it had been there from the beginning, but it definitely helps hide the ugly edge of the vinyl today.

- paint sink cupboard white(ish),
Cupboard color is Valspar Hotel St. Francis Clay Angel / Satin Gloss.
Cupboard color is Valspar Hotel St. Francis Clay Angel / Satin Gloss.
- finish wax cupboard,(tried it - didn't like it, painted over it)
- put handles on cabinet drawers and doors,
Drawer and door pulls on the sink cupboard are clear glass on brushed nickel, from Home Depot.
Drawer and door pulls on the sink cupboard are clear glass on brushed nickel, from Home Depot.
- paint the mirror was changed to remove and replace mirror,
Mirror purchased from Lowes.
Mirror purchased from Lowes.
- remove old sink,
- replace sink,
- replace faucet,
- replace back splash changed to replace countertop,
Faucet and Sink/countertop/backsplash combo purchased from Lowes.
Faucet and Sink/countertop/backsplash combo purchased from Lowes.
before ...
.JPG)
after ...
.JPG)
- tall stand beside sink
Moved the unit I had in my entrance hall to the bathroom, after painting it purple - see more info on this post.


- remove built in cupboard at shower wall
-place a cupboard/shelving unit at shower wall to store towels and misc,
Used the pie safe I had in my kitchen. It was a dark stained wood, but we painted it blue (and we now refer to it as the towel cupboard) - see more details in this post.
-
Used the pie safe I had in my kitchen. It was a dark stained wood, but we painted it blue (and we now refer to it as the towel cupboard) - see more details in this post.
before ...
.JPG)
now ...
.JPG)
- replace ceiling light,
Ceiling light purchased from Lowes (after several attempts with other options from Lowes and Home Depot). This light is an LED and requires no light bulbs. It brightens the room and seems to be working great, we'll see how long it lasts and how we like it.
Ceiling light purchased from Lowes (after several attempts with other options from Lowes and Home Depot). This light is an LED and requires no light bulbs. It brightens the room and seems to be working great, we'll see how long it lasts and how we like it.
- replace light over mirror,
Light over mirror purchased from Lowes.
Light over mirror purchased from Lowes.

-
-
Towel stand purchased from Amazon. (You might notice a package on the bottom of the stand - it's another shower curtain we liked, and we will change it out when this one gets bad. We had some fun shopping one day!) The pretty towels were given to us from a good friend when she learned about our bathroom redo.

- new floor mats
Rugs by toilet and shower are a two piece set purchased from Fred Meyers,
Rug under the blue pie safe cupboard is a sweater rug previously shown here, purchased from Ross,
Rug in front of sink purchased from Ross also previously shown here, folded in half to make it the right size - that means that when it gets dirty, we can fold it over and get four different uses out of it. ;) We do have a rubber mat underneath it to help hold it in place.
- new shower rod and curtain,
Shower rod and curtain purchased from Walmart. (used the same hooks we had.)
Shower rod and curtain purchased from Walmart. (used the same hooks we had.)
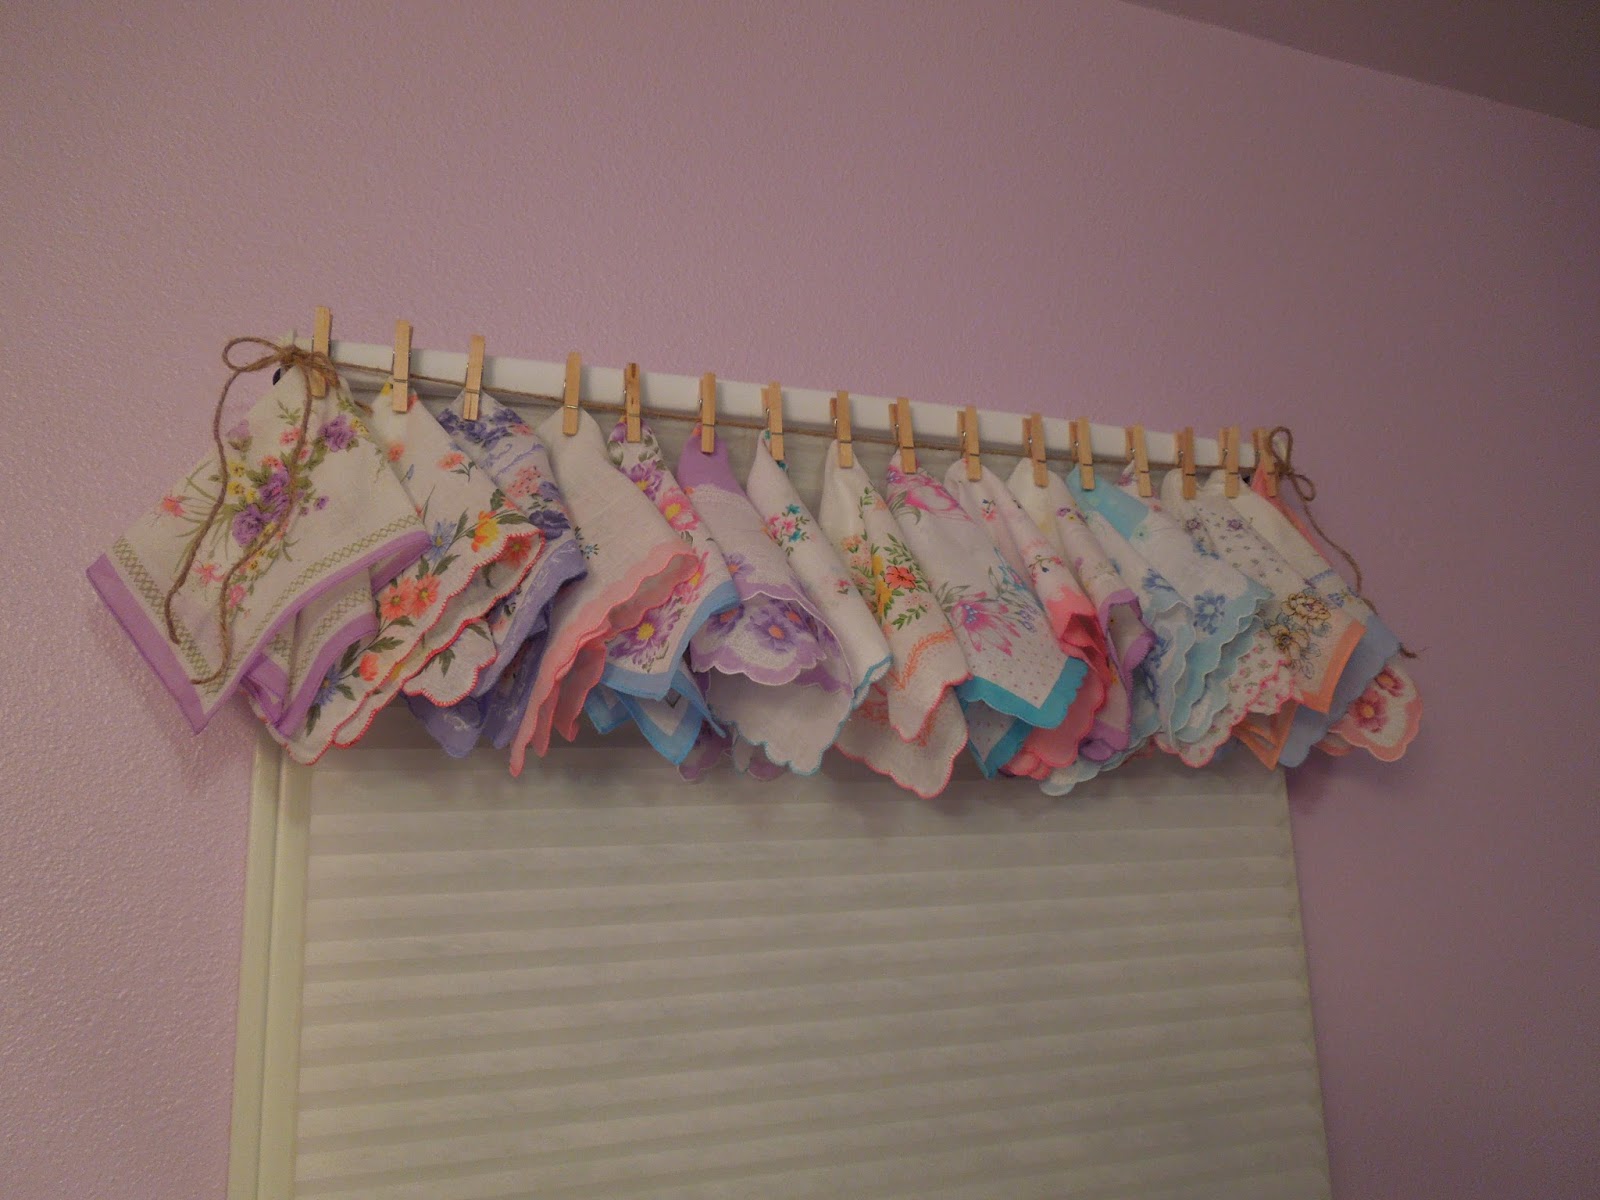
- new window covering,
Standard size blinds purchased from Lowes, and mounted on the outside of the trim because they were too large for the inside. (I prefer inside mount, but choose to forego, since I was not wanting to spend more time or money on special order blinds. Haven't I spent enough time already?)
Valance is Vintage handkerchiefs (pinned onto sisal twine with small clothes pins, and the sisal twine was tied to a hook I screwed into each end of the window frame). I had purchased these hankies on Ebay at least a year ago (maybe two), and I brought them out of My Stuff Room storage since they seemed to be a perfect fit for this room. We love it! (I had all the other parts and pieces for this valance in my craft supplies.)

-
Stand under window was purchased at Ross - painted it pink, distressed and waxed it, put the toilet paper roll holder on the side of it, and placed it into position. Doesn't it make a great toilet paper holder? I think so! See this post for more details.

.JPG)
The black looks pretty good against the purple in this photo above, but it didn't look good with the overall look, so we painted it pink. The pink doesn't look as nice against that wall, but the stand looks a lot better in pink. Maybe someday I will consider distressing it a bit more, but my arms were getting pretty tired and I was ready to be done, so I stopped as it is.
We do like it, and it fits a few of our favorite things quite nicely.
The picture and bowl was made by my aunt and given to my grandmother years ago. It used to sit on top of our built in cabinet (you can see it in one of the photos above), but looks much better down low on this pretty pink stand, and stuffed with more vintage hankies.
.JPG)
The item on the middle shelf is a blue blanket I purchased a few months ago (because it was beautiful, and on a great sale, and I knew I could enjoy using it somewhere - little did I know it would be in the bathroom). It fits perfectly there, crowned with a tray of leftover hotel lotions and a few other supplies.
.JPG)
The cute sheep on the bottom shelf was resting in the family room until we decided it would look nice on this shelf.
.JPG)
-
Great looking outlet covers purchased from Lowes (a bit more costly than the original, but very nice looking - and I only needed three).
- accessorize!*
*Small stand in front of towel cupboard was purchased from Goodwill and painted pink. (I don't know if it's a phone stand or a plant stand or what it's original purpose was, but it was $4.00 and I knew I could come up with a good use for it, though I was thinking of reception décor when I purchased it.) See this post for more info.
.JPG)
*Garbage can purchased from Lowes.
*The picture of mother and child was on the window wall before the redo and is back on that wall now, but I painted the frame the same color as the trim. More info here. (I found another photo of the bathroom from the past with this picture frame visible in the dark brown color. The old fan cover is also visible, as is the shower curtain that we removed and did not replace, and a bit of a shelf can be seen to the left of the sink that was also removed and replaced with the purple cupboard.)

*The mirror frame with the three flower hooks is something we have had for many years, hoping to use it in my daughters room, but it never seemed to work and I could never get rid of it. We brought that out of storage, painted it blue (chalk paint), distressed and waxed it, then added some awesome colored jewelry that we had stashed and stored. More info here.

*The three white and crystal canisters, previously shown at the end of this post, were from Ross. Purchased before the remodel began - but the idea was brewing.

*The three white and crystal canisters, previously shown at the end of this post, were from Ross. Purchased before the remodel began - but the idea was brewing.
*Rug hanging over towel cupboard door was a rug that my mother-in-law had. I didn't want to use it on the floor and ruin it, so it had been folded up and laid on a trunk or wooden crate for décor. It fit perfectly here, so we gave it a new home. Love the colors, and that we can now see it better.
*Shelf above toilet was reddish/brown in color and was in that place before the redo. See more info here. I painted it blue (chalk paint) and distressed and waxed it and replaced it.

*Sheep (for our baaath) and most other décor in small shelves were there previously too, or in other locations in the house.

*Small picture on the wall (left of the purple stand next to the sink) was previously on the wall by the light switch (just coming into the room) - I just changed the placement of it, keeping it in the room.
*Flowers (beside the purple stand next to the sink) have been used in the family room or in the entrance hall. I washed them and now they live in the bathroom.
*Black wall hook for the hair straightener was something I purchased a while ago, possibly from Joann's or Craft Warehouse. I wasn't using it at the moment, so we put it on the wall. We talked of painting it, but didn't get it done, so maybe we'll just leave it.
*Purple vase on tub was purchased for a display I did several years ago and it's just been kickin' around from room to room or storage cupboard to cupboard for years now. It has finally been able to come out of hiding to find a new home.

Other things were brought into the room to help complete the look we wanted.
*I received the tier on the countertop as a birthday gift from one of my kids and it fit so nicely in this room, filled with a few everyday items.
*I received the tier on the countertop as a birthday gift from one of my kids and it fit so nicely in this room, filled with a few everyday items.
*One little purple suit case, first seen here, found it's way into the bathroom and was stuffed with vintage hankies. Surely you have noticed the vintage hankies everywhere in this room - We were enjoying the opportunity to use them.
.JPG)
*This white vase was in the hutch in the family room, where it looked nice, but it really has a lovely look here against the purple wall and atop the blue cupboard, and with the beads hanging from it.
.JPG)
*On the purple stand we can see a few items that found their way into the room too, like the two crystal goblets (purchased from Goodwill, each with a bit of a chip in the rim, so they wouldn't be good for drinking from, but are lovely for displaying jewelry).
.JPG)
*More jewelry can be found hanging around, adding charm to the room.
.JPG)

And we are happy to have it complete.
Well, there is one more thing. The blue cupboard is missing two pulls - the store didn't have enough at the time, so I'll have to pick up two more next time they're in. But the rest is DONE!
Well, there is one more thing. The blue cupboard is missing two pulls - the store didn't have enough at the time, so I'll have to pick up two more next time they're in. But the rest is DONE!


.JPG)
.JPG)
.JPG)
.JPG)
.JPG)
.JPG)
.JPG)
.JPG)

.JPG)
.JPG)


.JPG)

.JPG)
