Tuesday, April 30, 2013

Celebrate May!

While cleaning my files I found a folder full of fun and silly reasons to make your day a special day ... things to celebrate ... every day ... any day. I remember having some fun with these years ago, using some of these ideas for a while before forgetting about them. I've found a few more and thought they'd be a fun addition to the blog. Some of these are quite ridiculous, but several are great for family fun, for preschool fun, for party fun, or just for fun!

Happy Celebrating!

May
 
 
Birthstone is Emerald, agate (meaning Love, Success)
Flower of the month is Lily of the Valley, Hawthorn
 
- Nat'l Bike Month
- Nat'l BBQ Month
- Nat'l Salad Month
- Date Your Mate Month
 
- 1st week is Nurse's Week - Wednesday of that week is Nat'l Nurses Day
- Tuesday of the first full week is Nat'l Teachers Day
 
- 1st Friday is Space Day
- 2nd Sunday is Mother's Day
- Last Monday is Memorial Day
 
 
- May Day 
- Mother Goose Day
- Cheerios released in 1941
- Save the Rhino Day
- Mr. Potato Head released in 1952
 
2
- Brothers and Sisters Day 
 
3
- Sun Day (began in 1978 dedicated to increase our awareness of solar energy)
 
4 
- Nat'l Bird Day
- Nat'l Candied Orange Peel Day
 
5
- Cinco De Mayo 
- Kodomo no Hi, Children's day in Japan
- Nat'l Hoagie Day 
 
6
- John Deere produced the first steel plow in 1833
- Beverage Day
 
7
- Johannes Brahms Birthday (b1833)
 
8
- No Socks Day
 
9
- Lost Sock Memorial Day
 
10 
- Nat'l Clean Up Your Room Day
 
11
 
12
- Flush Toilet patented (1792)
 
13
- Frog Jumping Day
 
14
- Motorcycle Day
- Nat'l Buttermilk Biscuit Day
 
15
- Nat'l Chocolate Chip Day
 
16
- Wear Purple for Peace Day
 
17
- Nat'l Cherry Cobbler Day
 
18
- No Dirty Dishes Day
- Visit Your Relatives Day
 
19
 
20
- Pick Strawberries Day
 
21
 
22
- Buy a Musical Instrument Day
 
23
- Lucky Penny Day
- World Turtle Day
 
24
 
25
- Ralph Waldo Emerson's Birthday (b1803)
 
26
 
27
- Masking Tape patented in 1930
 
28
 
29
 
30
- Water a Flower Day
 
31
- Nat'l Macaroon Day


Monday, April 29, 2013

B-day Pancakes and Sprinkles Party Decor

We moved into our house 21 years ago today and often celebrate this day as our House's birthday.

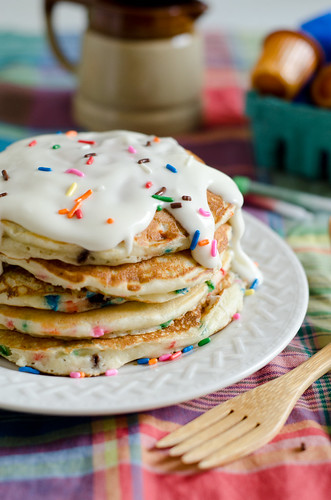
So, what a fun time to try these birthday pancakes from Seeded at the Table
(FYI - I did make these for breakfast and they were yummy.  We only used cool whip for the topping because they were sweet enough. )

Birthday Cake Pancakes 2

pancakes for breakfast is only the beginning - 


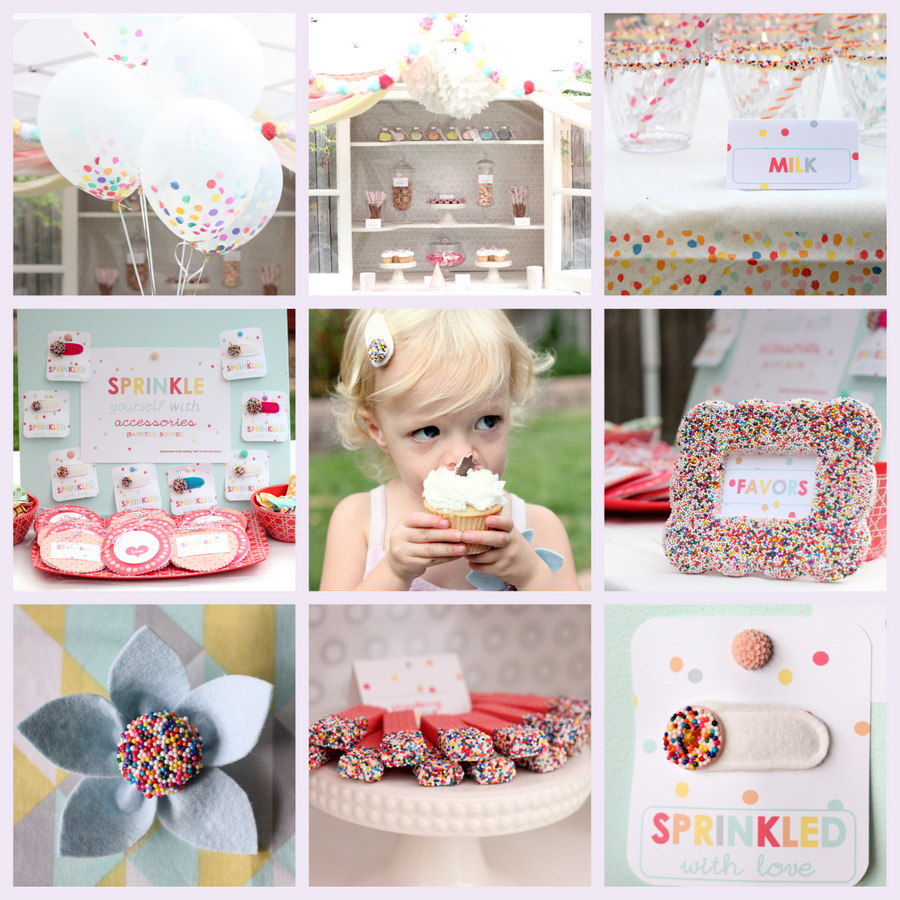
Instead of a cake for dessert, a fun idea might be to have a cupcake or cookie bar (complete with ice cream) where the guests (or family) could decorate their own dessert with assorted sprinkles.

image from here


There are many fabulous parties with sprinkles:

Sprinkled with Love from KoJo Designs


and


Sprinkle with Sweetness from Sweet Designs

Sucker for Sprinkles Dessert Table


and

How to Make a Festive Sprinkle Bag or Hat from Tikkido


All of this reminds me of the cute Mini Milkshake Shooters with the glasses dipped in sprinkles from a post I did couple years ago.

(Another FYI - I didn't do any of this other stuff today - just the pancakes!)

Sunday, April 28, 2013

Today is a Good Day!


today is a good day to have a good day print
image from here


"I hope each day we are thankful for life, for knowing that we are sons and daughters of God and that the fulness of the gospel of Jesus Christ is upon the earth. I hope we will have a desire and a determination to make each day a good day.


Each day will be a good day if we will think of the Savior and make Him the center of our lives, for He is “the light, and the life, and the truth of the world.”
 
Don’t worry about those things which you cannot change. If something can be done, do it. If nothing can be done, don’t worry about it. "


“For every worry under the sun,
There is a remedy, or there is none;
If there be one, hurry and find it,
If there be none, never mind it.”
 
Full Message by George I. Cannon found here
 
 
"This time, like all times, is a very good one,
if we but know what to do with it."
 
- Ralph Waldo Emerson


Saturday, April 27, 2013

DIY Awning

Sun Shade!
I first saw this at Curbly
Then found that the tutorial comes from here (You'll need to translate to English)
 
 
Other patio or deck coverings can be seen here
 

Friday, April 26, 2013

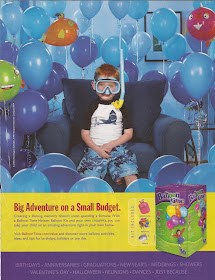
An Ocean of Balloons - A Party Look!

Are you getting anxious to get in the water?  Just wanna do some fishing?
Summer is on it's way, but maybe you don't have to wait for summer to do a bit of jumping around in the pond.
 
Under the Sea,
In a Fish Tank, or
Down by the Pond
- either way, this looks like a fun and cute water replacement.
I saved this look from a magazine ..., yes, years ago ..., because I thought it was a fun look.


Thursday, April 25, 2013

Lovin' the Look!

Here is another great look from Celebrations at Home.
I love the natural and neutral colors and textures of this overall look.
The little details are eye catching and heart pinching.
I love the vintage look - it always appeals to me.
 
These come from this post
 
Notice the buttons in the cute metal tray or bowl or ...?... what is that?
Of course I love the old spools with the lace and string around them.
The yellow ball flowers (whatever they are called) are a great pop of color - not too much, not too little.
 
shabby chic shower centerpiece
 
I love the stemware!
And notice the little bouquets of baby breath in the spools at each place.
The stitched hearts in the hoops are a great addition.
 
shabby chic-vintage inspired table setting for a bridal shower
 
large spools - shabby chic bridal shower
 
spool chair garland - shabby chic bridal shower
 
The thread stand or ladder with spools is a fun look, as is the framed button heart art.
The hoop hanging on the knob and a banner strung across it with the fabric measuring tape is a fun idea.
The decanters with different colored drinks / juices (non-alcoholic of course) - notice the little tags added to each to show what is in them.
The balls of yarns in coordinating colors add a great touch.
The drink stirrers in the stemware are fun.
I love the potting urn on the bottom shelf of that great metal shelf.
 
the bar area - shabby chic bridal shower
 
party decor - shabby chic bridal shower
 
 
and these next photos come from this post
 
More of the same - natural and neutral colors and textures combined for a lovely look and feel.
The ruffled backdrop is just right.
 
shabby chic dessert table - bridal shower theme
 
here is a close up of that lovely adorned cake
 
ribbon & trim "cake" - shabby chic dessert table - bridal shower theme
 
and a close up of the basket and hoop under the table
 
shabby chic bridal shower
 
Love is always in fashion
 
What a great basket!
Love the wood drawers filled with little lovelies.
Great garland on the front of it.
Great flowers on the top of the trail mix jars.
 
shabby chic bridal shower
 
A close up of things in the drawer / shelf show some unseen things from the upper photo that are so lovely. 
 
shabby chic bridal shower
 
This is a great look!

Wednesday, April 24, 2013

Smile Wrinkles

Wrinkles should merely indicate where smiles have been.

Mark Twain


image from google


Tuesday, April 23, 2013

Shadow Box Magnet

Here is a great idea from Crafts Unleashed


Umbrella Bouquet

This is a fun and lovely look for spring.


Monday, April 22, 2013

Lamp Shades

I thought this was lovely and wanted to remember this look in case I would do something similar some time some where.  It's from Freddy and Pentunia
 
Aleigha'a bed side light!
 
I'd love to see it turned on in the evening.

******

Here is another fun lamp shade cover.
From Unskinny Boppy

DIY-Sweater-Lampshade-Tutorial-by-Unskinny-Boppy-www.unskinnyboppy.com-2


Sunday, April 21, 2013

"Things will turn out better than you think" and other Encouraging Capsule Sermons


My husband often tells me
"things will turn out better than you think"

... and he's right ..., they usually do! I suppose it's a matter of attitude.


image found at LauriAnna's Vintage Home


This next saying leads me to believe that if they haven't turned out better than I thought, I just have to wait a bit longer to see how it really turns out.


image from the daily Quipple
 Remembering our past can be quite helpful because it can help us learn from our mistakes and our successes, but we shouldn't dwell on them -

“There are far, far better things ahead than any we leave behind.”
C.S. Lewis


Yip, our attitude seems to have a lot to do with our happiness in life!


So, let's move forward with a happy spirit!


"A pessimist sees the difficulty in every opportunity;
an optimist sees the opportunity in every difficulty."
  - Winston Churchill

SaveSave

Saturday, April 20, 2013

A Prom Dress Story, part 2

A Prom Dress Story Part 1 is found here, and tells a bit about the modest making of this dress - putting sleeves on a strapless prom dress.
Part 2 is the big reveal - the wearing of the dress, with the before and after photos.
 
The first wearing of this prom dress was for a prom in Wenatchee that the LDS church puts on for the youth.  It's a formal dance just like a prom, but there is no need for a date, just come and enjoy.  Several of our youth went to it, and had a great time.
 
Here is my beautiful daughter wearing her lovely dress, just a quick snap shot (that we almost forgot) on her way out the door.
 
 
Now the promised before and after photos. 


After all the worry and frustration and hard work, I was very pleased with the way things turned out.
 
 
Now, we are on the hunt for a pair of shoes she can wear with it for the next prom.  That prom is our high school prom that a friend asked her to.  Lucky that this dress gets to be worn twice.  That's usually not the case for a prom dress. 
 
 
A few facts:
- The dress was bought from David's Bridal.
- We bought two dresses (one to wear and one to use the fabric for the sleeves).
- These were the only two dresses of this kind and color.
- We had gone to the store and looked at dresses, finding a coral dress that we thought we'd come back for if we found nothing else anywhere else.
- We went back to the store to get the coral dress.  Found this, tried it on, LOVED IT!  Bought it!
- Each dress was originally $199.00. 
- Each dress was marked 50% off.
- Each dress then had $20.00 off.
- Our total for two dresses was less than the original price of one dress, and less than any single dress we saw anywhere else.
- This is the color of the dress we wished we could have purchased from an on-line site we found, but it was $479.00, and experience has told us that it would surely have been too low cut in the front.
 
WE ARE HAPPY with our final results.


Friday, April 19, 2013

A Prom Dress Story, Part 1

Prom Time!

I want a modest prom dress! 
Even the so-called modest prom dresses don't cover as much as I'd like them too. Why do some women and most designers wanna show off so much of their skin?  And I wonder why do some husbands want other men to see so much of their wives? Okay, I won't go any further with that, but it is frustrating.  Oh Bother!

I have a wonderful and lovely daughter that likes to be modest too.  We went to purchase her first prom dress and found what we expected - almost every dress was without sleeves and most without any kind of strap.  (again) Oh Bother!

We found some that claimed they were modest and they did have a small sleeve, but they were still so low and wide cut in the front and back.  WHY?   We couldn't figure out how to alter those without making them look uglier that sin.

Okay, enough ranting ...,

We did however, find a dress.  But we have to make it modest.  It was strapless , uggh!,  that just wouldn't do - we needed to cover those shoulders!!!!  So, we bought a second dress, exactly like the first one, to cut up and make sleeves with. Oh Wow!

So, Monday we bought the dress(es).

Tuesday (after school I might add) we started making a pattern after debating with myself all day about whether I should attempt this thing on my own or take it to someone who really knows what they are doing.  I decided to let me do it. 

My model (my daughter) put on the dress and we pinned it to size - it was too big and too low.  I stitched up the side seams.  That was easy, so on with the rest of it. 

She put the dress on again and then put on an old white shirt over top of it.

I took a marker and drew exactly where I wanted each seam or edge to be - making a pattern.  I cut out that shirt (outside of the mark I had made, of course, I remembered to leave a enough room for a seam) and sewed my pieces together.
I pinned it to the dress and had my model try it on again.  That was helpful, but didn't work like we hoped, so it ended up in the garbage. 


At this point I was thinking I had made the wrong choice - I should have taken it to someone else who knew what they were doing.


Wednesday we continued making a pattern ...


Having learned a few things from my first attempt, I cut up an old pillow case and tried again. (I didn't have another white shirt to use.) 


This time I thought I had it how we wanted it,so I cut out the dress fabric to make the real thing (or that part of the real thing, the part that goes over the shoulder that you sew the sleeve to).  It was okay, but when we laid it over her shoulder we could see that it needed another layer, so I took out the hems and cut out two more of the same things and sewed them together for a double layer.  Perfect!  Too bad I don't have a photo of it huh!

Here are some of the scraps - ;)


(Okay, I confess, I did have a couple chocolate kisses while I was working on this dress, but I didn't get chocolate anywhere else - nothing on the dress, I promise!)


Pretty color huh!  And so sparkly!

Thursday - yeah! at this point the pattern was working so I started folding and laying the outer layer over the inner layer ..., attempting many times to come up with the look I was seeing in my mind.
It was a bit frustrating ..., I was not working with a  professional pattern, I was only working with my mind's eye ..., and sometimes my vision is a little off.  I do own a sewing machine and have sewn a few items in my lifetime, but I am not a seamstress.  Why didn't I take this to someone else who knew what they were doing?

I did want to take it to someone else, but I've seen some of what others have done to put sleeves on a dress and as nice as they are, I was wanting something a bit different.  And, I thought I could figure it out and make it work, even with all the frustration that I knew would come with it all.  I really wondered if I had made the wrong decision and wondered if I should call someone at this point, but I kept going since I created this mess myself. 


Finally I found what I thought would work - the part that goes over the shoulder (it might be called a yoke but I think I'll call it a strap, but it's a wide strap)  would not have a sleeve sewn to it, because I just couldn't make it work (at least not without a pattern).  We would have to create a seemless sleeve.  The strap was made with the silk part of the dress and then a longer overlay of folded tulle over it, draping down the arm would help create the sleeve. 

I did all that I could up to the point of sewing it to the dress.  It was pinned together (everywhere) and ready to try on, again.  It seemed forever before my model got home from school that day.  I was so anxious.


When she did get home she tried it on and we were so excited that it seemed to be doing exactly what we were wanting.  Well, almost exactly, we still had to work out a couple things, but we were on the right track.  That excitement gave me a bit more energy and enthusiasm about this project I began. 

 I started hand stitching the sleeve to the dress, coming up with some helpful ideas to fix some of the concerns and flaws as we went along, like stitching the folds of the sleeve to a piece of ribbon (placed on the underside of the sleeve) to keep the folds where they should be as they draped over the upper arm. (the ribbon is barely visible in this next photo, just above the hanger.)


There were so many little things I had to figure out as I went along.
I forgot to mention earlier that we folded down part of the front of the dress just in front of the arm so that when we raised the dress (so that it wouldn't be so low) it wouldn't cut up under her arm pit.  There are plastic "sticks" or "wire" type things inside the seams to help the dress stand up.  I had to cut those out to fold it down.  I also had to remove the inside padding over the breasts because it was in the wrong place once we raised it up. It isn't necessary anyway because she will be able to wear her own underwear since we put sleeves on. There were so many details I never realized would come up, and it was quite challenging at times.

 I continued the project - pinning and clipping and repinning, sewing and clipping and sewing, completing it at about 10:20 pm. Thursday night.  My finger tips are very sore.


Well, okay, it wasn't completely complete.  Friday morning I gave it a second stitching to make sure things were secure and then cut off some of the rough edges, like the glittery ruffles seen on the left of this next photo.  There used to be the same thing on the right side, but they have been cut off so they don't irritate the skin - this is the inside of the dress. The lower half of the photo is the inside of the sleeve we added. I guess you know that I have more work to do - gotta cut off that other ruffle now.


(Oh, please don't look at my stitching, I didn't care what it looked like on the inside - I was trying to sew and at the same time talking and loving my children and grandchildren around me, and getting up and down to help make dinner, and my eyes and my fingers  and my neck were all aching ,.., excuses, excuses! I really didn't care!  You get to see it like it is!  I already said I was not a professional.)


I am so happy with our finished project! 

You are probably wishing I would have shown the finished project already, but I just can't do that.   It's painful I know, but I'm gonna wait until my model is wearing it for the prom.   Patience is a virtue!  ;)

 However, here is the dress we cut up to make the sleeve.


I promise to show the before and after photo in another post ..., later.  (here)


Favors

Cutely wrapped pillow box favor - love the ripped fabric look
from The Plaid Barn - a daily special spot
(sorry this special is a past one - over and gone - but still love the look.)
 
 
 ---

Cutely wrapped paper bags from Bubble and Sweet


Thursday, April 18, 2013

Goo Remover

Recipe to make your own Goo Remover - from 7th House on the Left - sounds great!
 
coconutoilbakingsoda DIY NON TOXIC GOO REMOVER


Wednesday, April 17, 2013

Rain Storms are for Dancing In!

 
image from here


Tuesday, April 16, 2013


This is such a beautiful look.  The sets of stairs/steps - the close up and the back set too.  The plants and pots and stones and ..., it's a lovely area all together.  And it's so clean.  I dream of a place without weeds, but don't own one. This is a combination of man made and natural items at it's finest.  This could be a great home away from home for a week or two get-away. (Like I do that!) From Gypsy Purple Home


Home is where it's at!  Even with the weeds.  I love my home!

This isn't my home, but I love the color combo on this home from Celebrations at Home
 
Housewarming party ideas


Monday, April 15, 2013

Party Ideas and Bonnie Oscarson and The Good Fairies ...

I found some fun looks on Bonnie Oscarson's Party Ideas pinboard, and needed to save some of them.
Here are a few of my favorites (that I haven't already seen and saved).
I do not know Bonnie Oscarson, but have recently been introduced to her pins - and have decided that she is a great person to follow ..., for her pin boards and for her example and counsel. (read a little about her here, and about her and her family here)

These fun swirls can be purchased from Shindigz - it looks like a fun place for party supplies.
(or as suggested on pinterest - cut your own out of poster board)


---
I like this look too.  Garlands are a big favorite of mine - the streamers hanging for this backdrop are so cute.  I love the different shapes, and of course the pinks are pretty.  And, that saying on the wall "What to be is up to me!" has been a favorite of mine for many years now.


I found it really interesting that she had a few pins with balloons and streamers similar to this next photo - when I see them I'm just sure she has the thought of using this idea with all of the Young Women Value colors ( ... I would!). 


Aren't these fun crowns - that I don't usually have a need for, with an older daughter instead of a younger daughter, but again, I see these used as beautiful decor for a lovely Young Women Event.


Because of my days of blanket tents on the clothes line, in my childhood years, I have become a fan of the fun tent and canopy looks found these days.  This is another fun canopy look - outside, with balloons surrounding it.  One fun note with this pin (and the real reason I am saving this look) was to use golf tees to hold the balloons down on the ground.  I'm not a golfer, so I probably wouldn't have thought of that.


Here is a fun favor idea, or lunch idea ...
Boxed milk and donuts.  I love fun and creative boxed lunches for a great picnic - or in this case a great favor for a couples party.


I think I've seen this look before, but don't know if I saved it, so I'm saving it here - napkin ring menu card.  This is also a fun idea for a great quote or wish or fun fact displayed for the guests.


Fun way to create your own candle holders with lamp shades.


Here is a cute garden party look.


Now, just because I think it's cute, I've added this one last photo I saw here.  Bonnie Oscarson has pinned it on her Funny Stuff Board, which has some really cute funny stuff - worth taking a peek at.
And, something else I found, tracking this cute pin - Unlimited Tator Tots, a blog belonging to her daughter, and a great post about her experience when her mother was called.


And, FYI, Elaine S. Dalton is on pinterest too - no party board, but other great looks she has saved - I love her Quotable Quotes Board.


SaveSave